先确认你真的需要这一篇。如果你有 ZoneFoundry 桥接,或者愿意在家里留一台设备(专用 iPad、闲置 iPhone)开着 ZoneFoundry,那就不用做这里的任何一步 —— 在 App 里勾房间、配传感器就完事,几分钟搞定,看 Follow-Me — 音乐跟着你走。这一篇是给「两样都没有」的人:设置长一些,但换来 App 关掉、手机不在家也照跟。先確認你真的需要這一篇。如果你有 ZoneFoundry 橋接,或者願意在家中留一部裝置(專用 iPad、閒置 iPhone)開著 ZoneFoundry,那就不用做這裡的任何一步 —— 在 App 裡勾房間、配感應器就完事,幾分鐘搞定,看 Follow-Me — 音樂跟著你走。這一篇是給「兩樣都沒有」的人:設定長一些,但換來 App 關掉、手機不在家也照樣跟。Make sure you actually need this guide. If you have the ZoneFoundry bridge, or you're happy to leave a device at home (a dedicated iPad, a spare iPhone) with ZoneFoundry open, you don't need any of the steps here — just tick your rooms and pair a sensor in the app, done in minutes: see Follow-Me — music walks with you. This guide is for people who have neither: a longer setup, in exchange for following you with the app closed and your phone out of the house.
三个执行体,选哪个三個執行體,選哪一個Three executors — which one runs it
Follow-Me 的「换房间」这件事,可以由三个不同的东西去执行。它们会自动让位:谁离喇叭近谁做,不用你选、也不会打架。Follow-Me 的「換房間」這件事,可以由三個不同的東西執行。它們會自動讓位:哪一個離喇叭近哪一個做,毋須你選,也不會打架。The room hand-off can be done by three different things. They stand down for each other automatically — whoever is closest to the speakers takes the job, and they don't fight.
- 桥接(24/7) —— 优先级最高,在你家局域网内直接控制,反应最快。橋接(24/7) —— 優先級最高,在你家裡區域網內直接控制,反應最快。Bridge (24/7) — highest priority, controls the speakers directly on your home network, fastest to react.
- 本机(免桥) —— ZoneFoundry 开着在前台、并且连着家里 Wi-Fi 时由这台设备做。适合一台专用 iPad 或闲置 iPhone。本機(免橋) —— ZoneFoundry 開著在前台、而且連著家裡 Wi-Fi 時由這部裝置做。適合一部專用 iPad 或閒置 iPhone。This device (bridge-free) — runs while ZoneFoundry is open in the foreground on your home Wi-Fi. Good for a dedicated iPad or a spare iPhone.
- 云端(24/7,免桥) —— 上面两个都不在岗时才轮到它。这份教程就是设置这一档。雲端(24/7,免橋) —— 上面兩個都不在崗才輪到它。這份教程就是設定這一檔。Cloud (24/7, bridge-free) — steps in only when neither of the others is on duty. This guide sets up this one.
会不会互相打架?不会。云端收到事件后会先等几秒让更近的执行体先做,然后自己也走一遍 —— 但所有动作都是幂等的:加入时如果发现自己已经在某个正在播音乐的组里,就原地不动、也不碰音量;离开时如果发现自己已经独立,就直接跳过。所以最多白跑一趟,不会把喇叭搬来搬去。會不會互相打架?不會。雲端收到事件後會先等幾秒給更近的執行體先做,然後自己都執行一次 —— 但所有動作都是冪等的:加入時如果發現自己已經在某個正播緊音樂的組裡面,就原地不動,也不會改音量;離開時如果發現自己已經獨立,就直接跳過。所以最多白跑一趟,不會把喇叭搬來搬去。Do they conflict? No. When the cloud receives an event it first waits a few seconds to let a closer executor act, then goes ahead anyway — but every action is idempotent: on join, if the room is already in a group that's playing music it stays put and doesn't touch the volume; on leave, if the room is already standalone it skips. Worst case it does a redundant pass; it never shuffles speakers around.
开始前你需要開始前你需要Before you start
- ZoneFoundry 已经登录 Sonos 云(首页顶部不再显示「点此登录」)ZoneFoundry 已經登入 Sonos 雲(首頁頂部不再顯示「點此登入」)ZoneFoundry already signed in to Sonos cloud (the home screen no longer shows "Tap to sign in")
- 每个想跟着你走的房间,各有一个动作/人体存在传感器,并且已加进 Apple「家庭」(领普 ES5、Aqara P1/FP2/E1、Eve、Hue、Onvis 都可以)每個想跟著你走的房間,各有一個動作/人體存在感應器,並且已加入 Apple「家庭」(領普 ES5、Aqara P1/FP2/E1、Eve、Hue、Onvis 都可以)A motion / presence sensor in each room you want to follow you, already added to Apple Home (Linptech ES5, Aqara P1/FP2/E1, Eve, Hue, Onvis all work)
- ZoneFoundry 里已经授权 HomeKit 权限(Follow-Me 页的检查表两行都要打勾)ZoneFoundry 裡已經授權 HomeKit 權限(Follow-Me 頁的檢查表兩行都要打勾)HomeKit permission granted in ZoneFoundry (both rows in the Follow Me prerequisites checklist ticked)
- 建议:家里有家庭中枢(HomePod/Apple TV/常插电的 iPad)。没有的话自动化只在你手机在家且唤醒时才跑。建議:家裡有家庭樞紐(HomePod/Apple TV/長期插電的 iPad)。沒有的話自動化只在你手機在家裡而且喚醒了時先跑。Recommended: a Home Hub at home (HomePod / Apple TV / a plugged-in iPad). Without one, automations only fire while your phone is home and awake.
第一部分 · 在 App 里拿到链接第一部分 · 在 App 度取得連結Part 1 — Get your links in the app
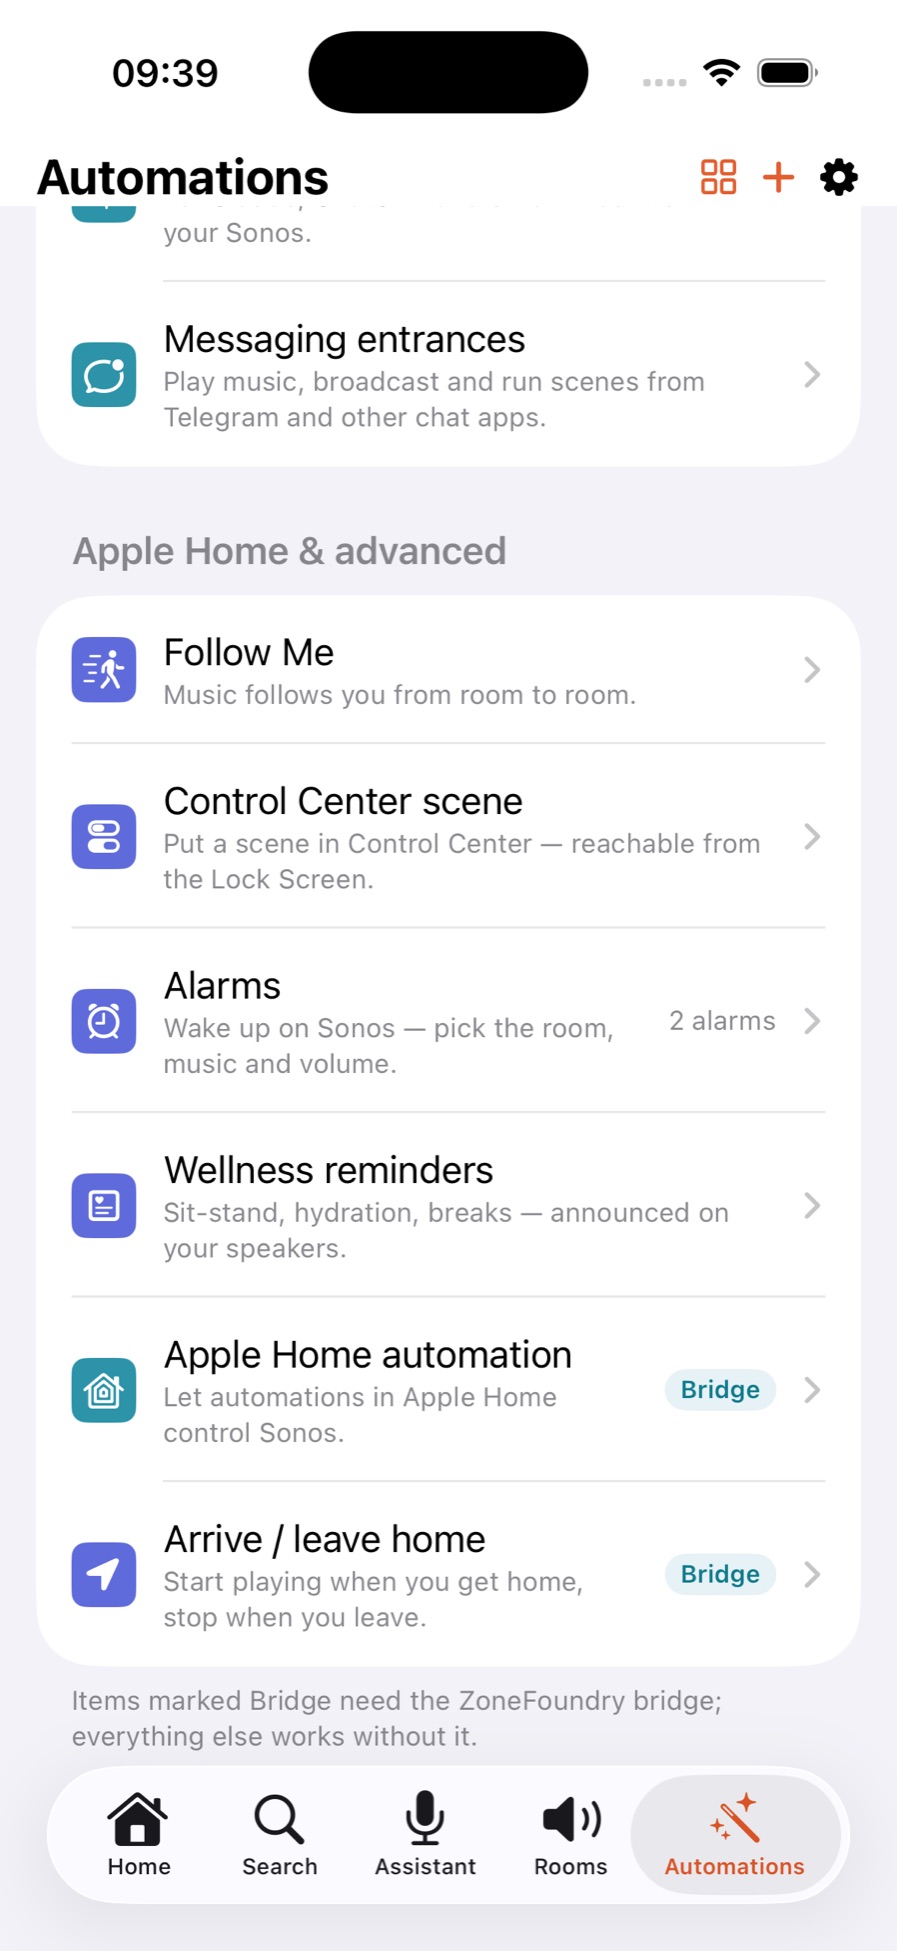
「自动化」标签 → 往下滑到「Apple Home & advanced」「自動化」標籤 → 向下捲到「Apple Home & advanced」Automations tab → scroll down to "Apple Home & advanced"
Follow Me 不在页面上半部。上半部是 Scenes、Schedules、Connected Agents,里面没有它。一直往下滑到最后一组,标题是「Apple Home & advanced」,Follow Me 是那一组的第一行。Follow Me 不在頁面上半部。上半部是 Scenes、Schedules、Connected Agents,裡面沒有它。一直向下捲到最後一組,標題是「Apple Home & advanced」,Follow Me 是那一組的第一行。Follow Me is not in the top half of the page — that's Scenes, Schedules and Connected Agents. Keep scrolling to the last group, headed "Apple Home & advanced". Follow Me is the first row in it.
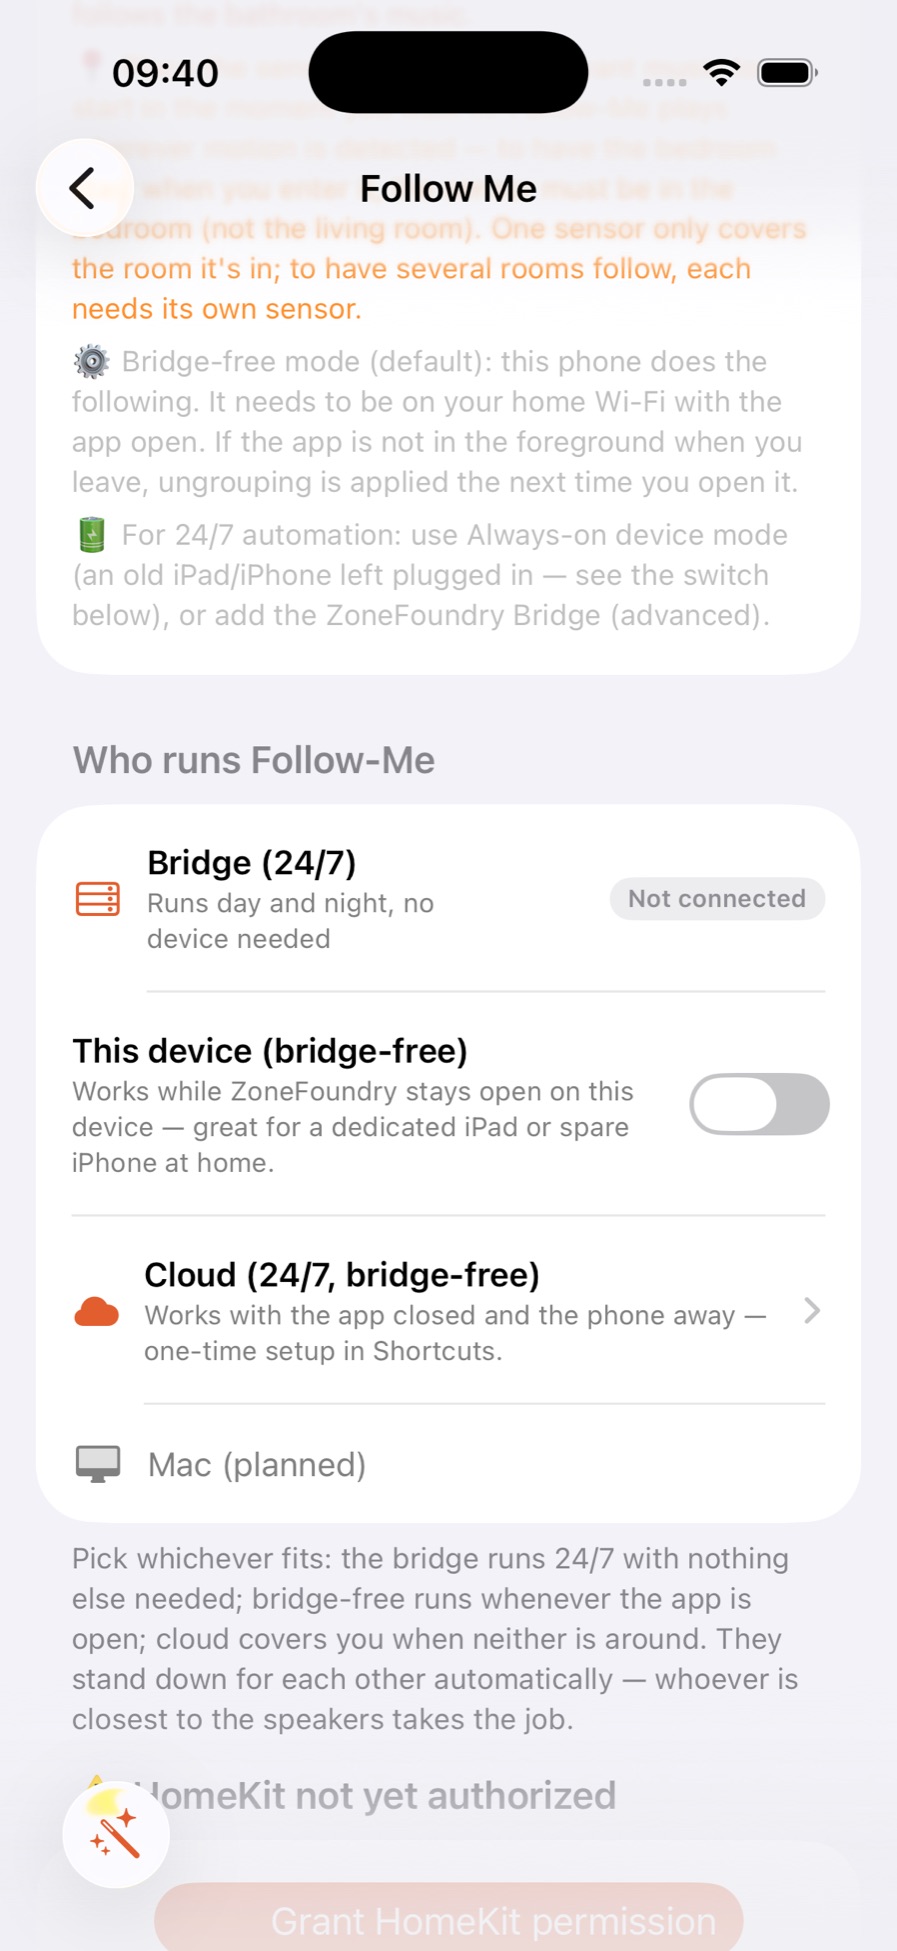
进 Follow Me,再往下滑到「Who runs Follow-Me」入 Follow Me,再向下捲到「Who runs Follow-Me」Open Follow Me, scroll to "Who runs Follow-Me"
三个执行体排成一列,点第三个:「Cloud (24/7, bridge-free)」。三個執行體排成一列,點第三個:「Cloud (24/7, bridge-free)」。The three executors are listed together — tap the third one: "Cloud (24/7, bridge-free)".
点「Get my links」點「Get my links」Tap "Get my links"
每间房会出两条链接:有人进来 → 加入正在播的那一组,以及房间空了 → 隔一段时间自己退出。三间房就是六条。每間房會出兩條連結:有人入來 → 加入正播緊那一組,同埋房間空了 → 隔一段時間自己退出。三間房就是六條。Each room gets two links: someone arrives → join the music, and room empties → leave after a delay. Three rooms means six links.
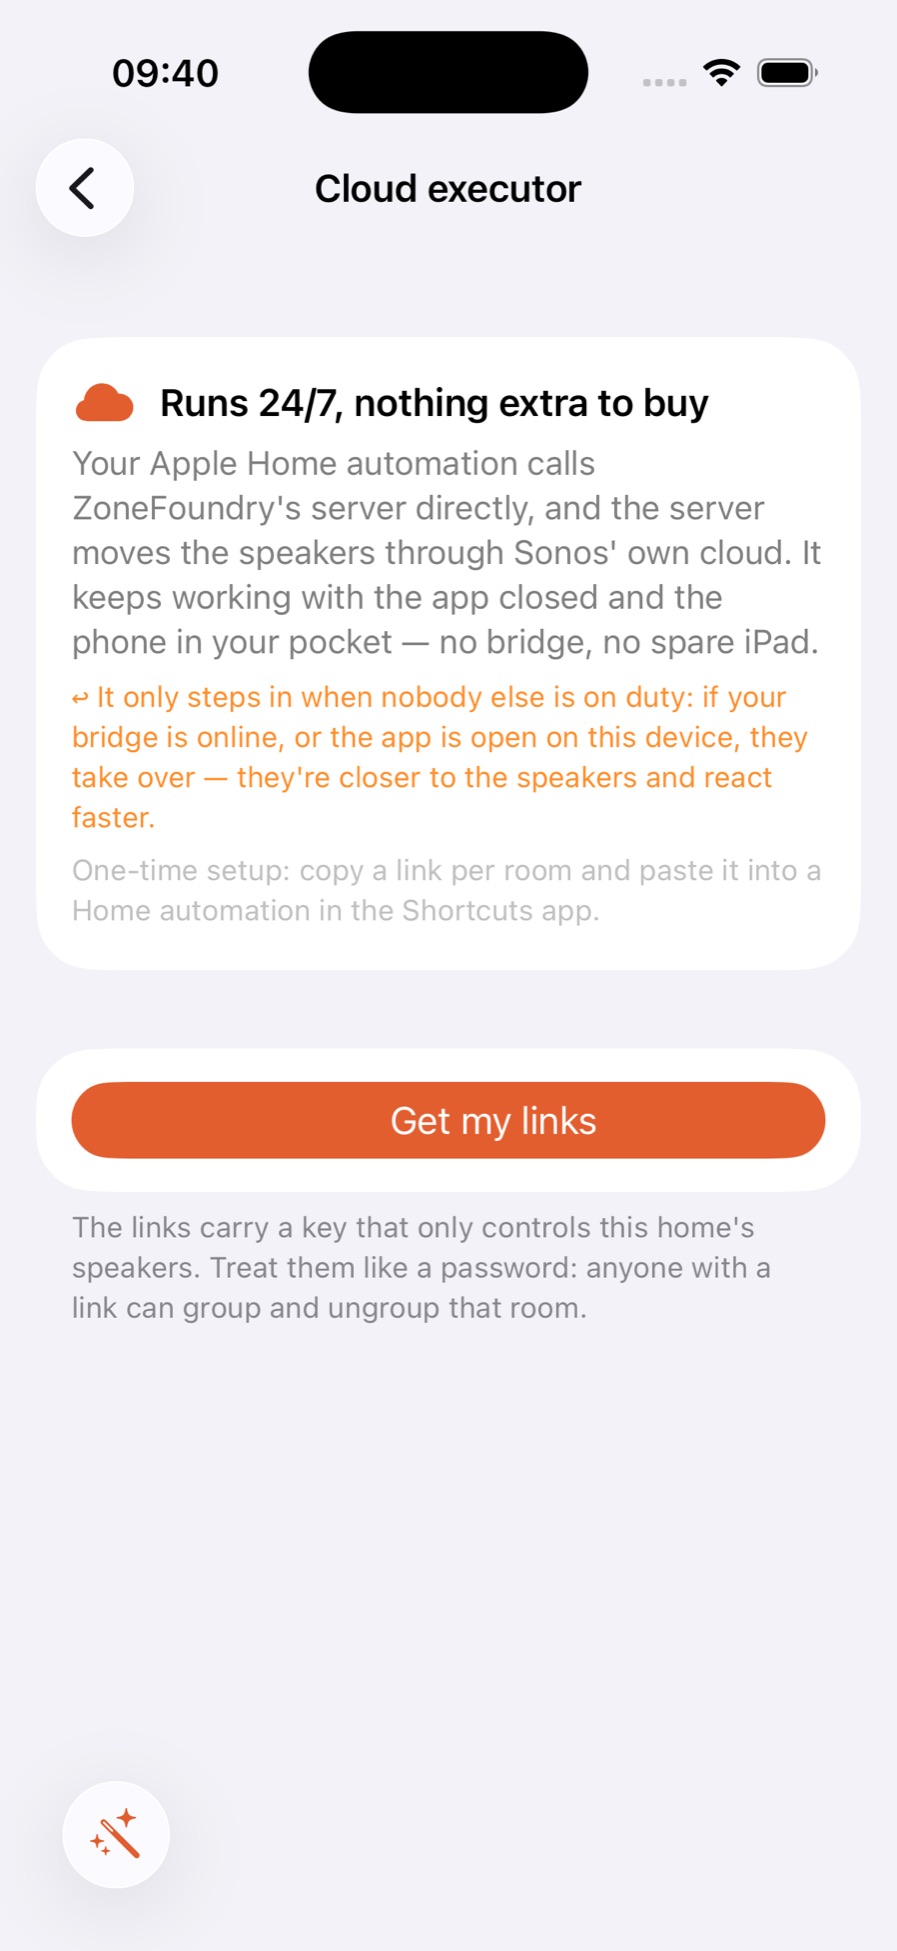
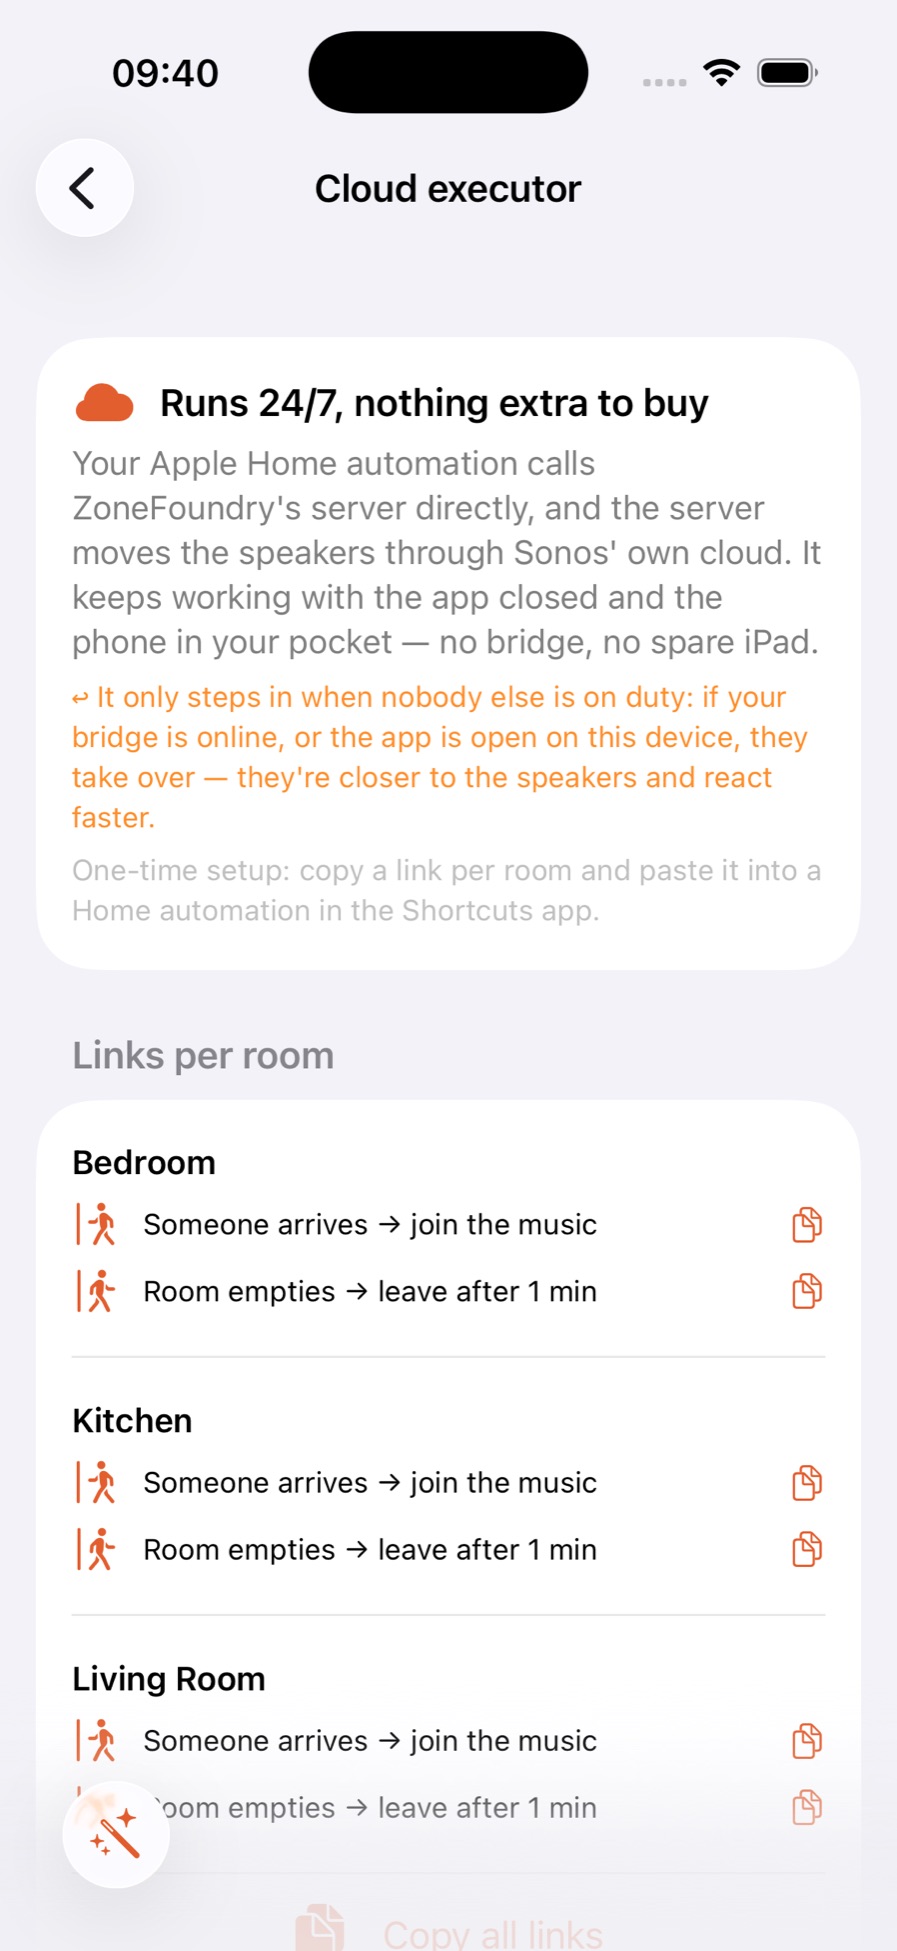
把这些链接当密码看待。链接里带着一把只管你这个家的钥匙 —— 谁拿到链接,谁就能编组/解组那间房。别贴到群里、论坛或任何公开地方;截图分享前先把 token 涂掉。把這些連結當密碼看待。連結裡面帶著一把只管你這個家的鑰匙 —— 誰取得連結,誰就可以編組/解組那間房。不要貼到群組、論壇或者任何公開地方;截圖分享前先塗走 token。Treat these links like a password. Each one carries a key that controls this home's speakers — anyone with the link can group and ungroup that room. Don't post them in group chats, forums or anywhere public, and redact the token before sharing a screenshot.
第二部分 · 「复制全部链接」是干嘛的第二部分 · 「複製全部連結」是做乜的Part 2 — What "Copy all links" is for
页面最底那个按钮不是「一键导入」,它不会帮你建自动化。它只做一件事,但这件事能省掉五轮 App 来回切换。頁面最底那個按鈕不是「一鍵導入」,它不會幫你建自動化。它只做一件事,但這件事可以省回五輪 App 來回切換。The button at the bottom is not a one-tap import — it doesn't create any automations. It does exactly one thing, but that one thing saves you five round trips between apps.
- 每行右边的小图标:只复制那一条。复制完就要马上切去「家庭」贴掉,再回来复制下一条 —— 三间房要来回六轮。只设一间房的话这样最快。每行右邊那個細圖示:只複製那一條。複製完就要立刻切換到「家庭」貼上,再回來複製下一條 —— 三間房要來回六轉。只設一間房的話這樣最快。The icon on each row: copies just that one link. You then have to switch to the Home app, paste it, and come back for the next one — six round trips for three rooms. Fine if you only have one room.
- 底部的「Copy all links」:一次把六条链接连同房名和用途标签放进剪贴板。粘到「备忘录」里,接下来整个设置过程只在「家庭」App 里做,不用再回来。两间房以上就该用这个。底部的「Copy all links」:一次過把六條連結連埋房名同用途標籤放入剪貼簿。貼落「備忘錄」,之後整個設定過程只在「家庭」App 度做,不用再返來。兩間房以上就應該用這個。"Copy all links" at the bottom: puts all six links on the clipboard with their room names and labels. Paste that into Notes, and the rest of the setup happens entirely in the Home app. Use this for two rooms or more.
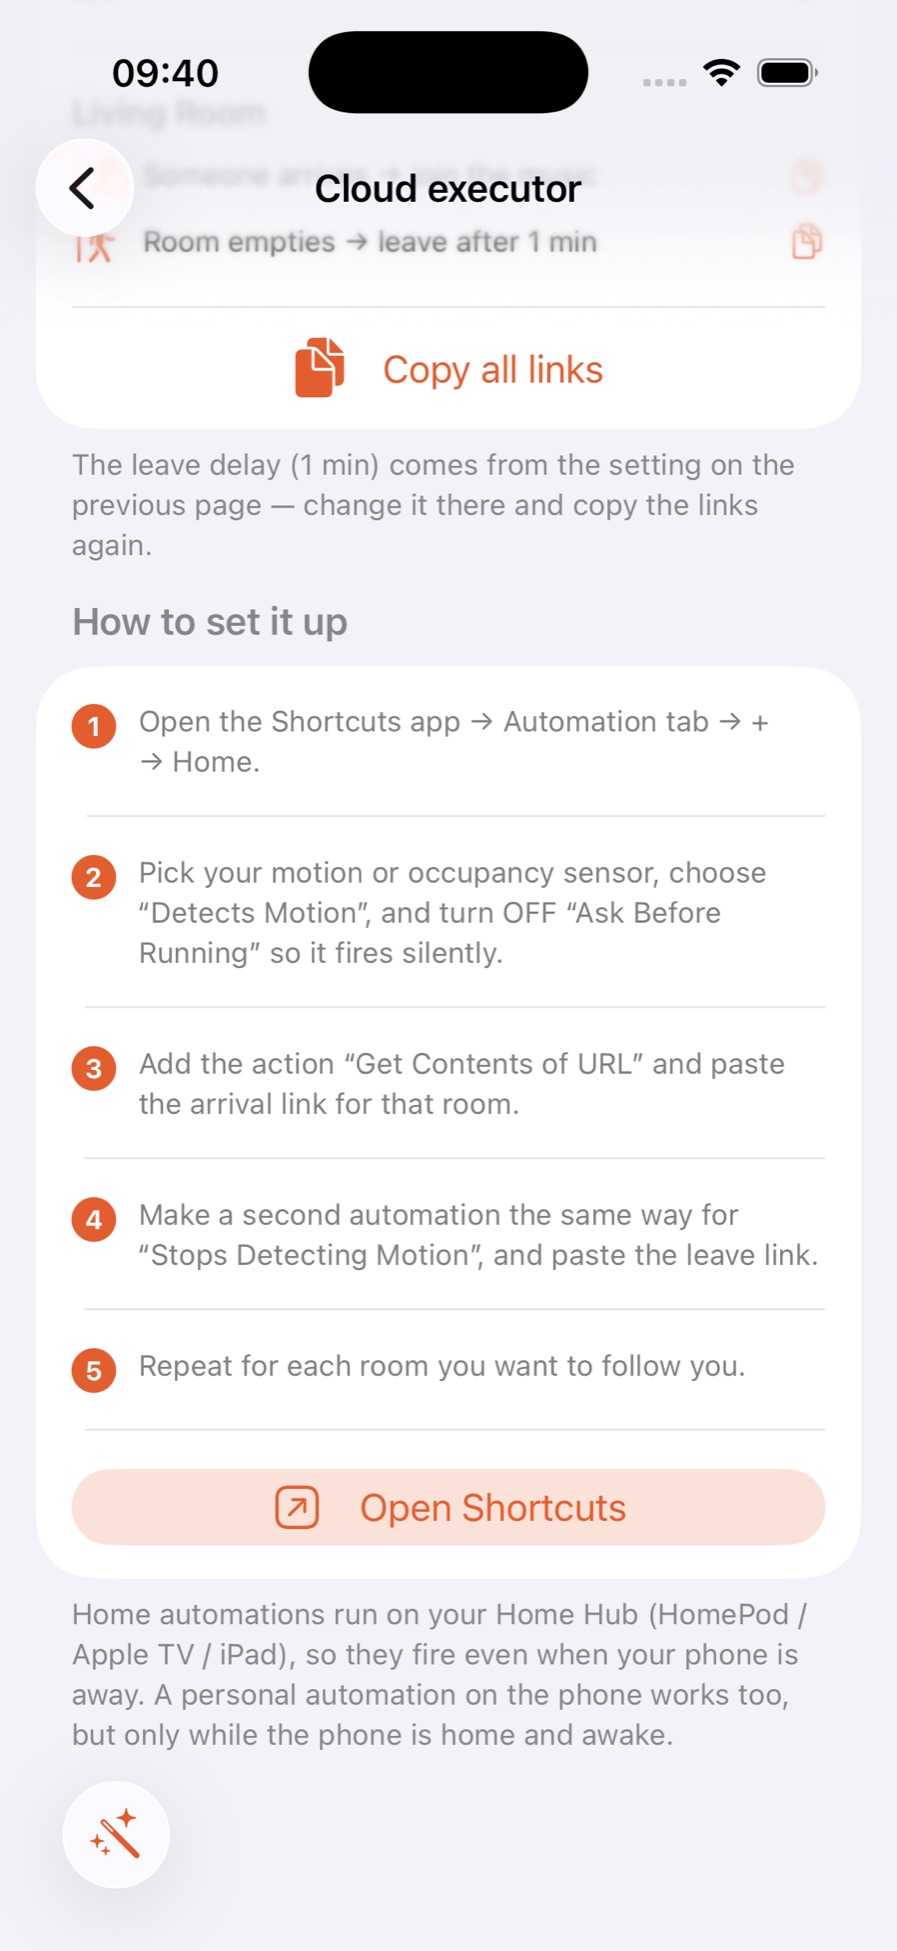
粘出来长这样(token 已打码)—— 价值就在那两行标签,六条裸链接贴出来根本分不清哪条是哪条:貼出來是這樣(token 已打碼)—— 價值就在那兩行標籤,六條純連結貼出來根本分不清哪一條是哪一條:What you get looks like this (token redacted) — the value is in those label lines; six bare URLs are impossible to tell apart:
ZoneFoundry Follow-Me links

── Bedroom ──
Someone arrives → join the music
https://relay.zonefoundry.dev/api/followme/webhook?token=zfwh_xxxx&room=Bedroom&presence=in
Room empties → leave after 1 min
https://relay.zonefoundry.dev/api/followme/webhook?token=zfwh_xxxx&room=Bedroom&presence=out&delay=60

── Kitchen ──
…设置完把备忘录那一条删掉。設定完把備忘錄那一條刪掉。Delete that note once you're done.
第三部分 · 在「家庭」App 里建自动化第三部分 · 在「家庭」App 度建自動化Part 3 — Build the automation in the Home app
入口是「家庭」App,不是「快捷指令」。从「快捷指令」也能建,但要一直滑到触发条件列表最底才找得到「家庭自动化」那一段,绕。下面这条短很多。入口是「家庭」App,不是「捷徑」。由「捷徑」都建得到,但要一直捲到觸發條件列表最底先找到「家庭自動化」那一段,很繞。下面這條短很多。Start in the Home app, not Shortcuts. You can build it from Shortcuts, but you have to scroll the whole trigger list to the very bottom to find the "Home Automation" section. The path below is much shorter.
「家庭」App → 自动化 → 右上角 + → 「传感器检测到某项内容」「家庭」App → 自動化 → 右上角 + → 「感應器偵測到某項內容」Home app → Automation → + → "A Sensor Detects Something"
弹出的「新建自动化」有五个选项:有人到达、有人离开、某个时间、配件被控制、传感器检测到某项内容。选最后一个。彈出的「新增自動化」有五個選項:有人到達、有人離開、某個時間、配件被控制、感應器偵測到某項內容。選最後那個。The New Automation sheet lists five events: People Arrive, People Leave, A Time of Day Occurs, An Accessory is Controlled, and A Sensor Detects Something. Choose the last one.
选这个房间的传感器 → 「检测到有人」→ 下一步選這間房的感應器 → 「偵測到有人」→ 下一步Pick that room's sensor → "Detects Occupancy" → Next
传感器按房间分组列出,选这个房间那个人体存在/动作传感器。下一页两个单选,选「检测到有人」(这是「进」那条)。下面的「时间=任意时间」「成员=关」保持默认。感應器按房間分組列出,選這間房那個人體存在/動作感應器。下一頁兩個單選,選「偵測到有人」(這條是「入」)。下面的「時間=任意時間」「成員=關」保持預設。Sensors are grouped by room — pick the presence / motion sensor for this room. On the next screen choose "Detects Occupancy" (this is the arrive one). Leave Time = Any and People = Off.
这一页什么都不要选 —— 滑到最底点「转换为快捷指令」這一頁乜都不要選 —— 捲到最底點「轉換為捷徑」Select nothing on this screen — scroll to the bottom and tap "Convert To Shortcut"
「选择要自动化的场景和配件」会列出你家所有灯、音响、恒温器 —— 一个都不要勾。一路滑到页面最底,有一个橙色的「转换为快捷指令」,点它。「選擇要自動化的場景和配件」會列出你家裡所有燈、音響、恆溫器 —— 一個都不要勾。一路捲到頁面最底,有一個橙色的「轉換為捷徑」,點它。"Select scenes and accessories to automate" lists every light, speaker and thermostat in your home — tick none of them. Scroll all the way to the bottom and tap the orange "Convert To Shortcut".
这一步最容易卡住。不勾东西的话右上角「下一步」是灰的,很多人以为走不下去。出口在页面最底那个按钮,不在右上角。這一步最容易卡住。什麼都不勾的話右上角「下一步」是灰的,很多人以為走不下去。出口在頁面最底那個按鈕,不在右上角。This is where most people get stuck. With nothing ticked, "Next" in the top right stays greyed out and it looks like a dead end. The way forward is the button at the very bottom, not the top right.
加动作「获取 URL 内容」,把链接贴进去加動作「取得 URL 內容」,把連結貼進去Add "Get Contents of URL" and paste the link
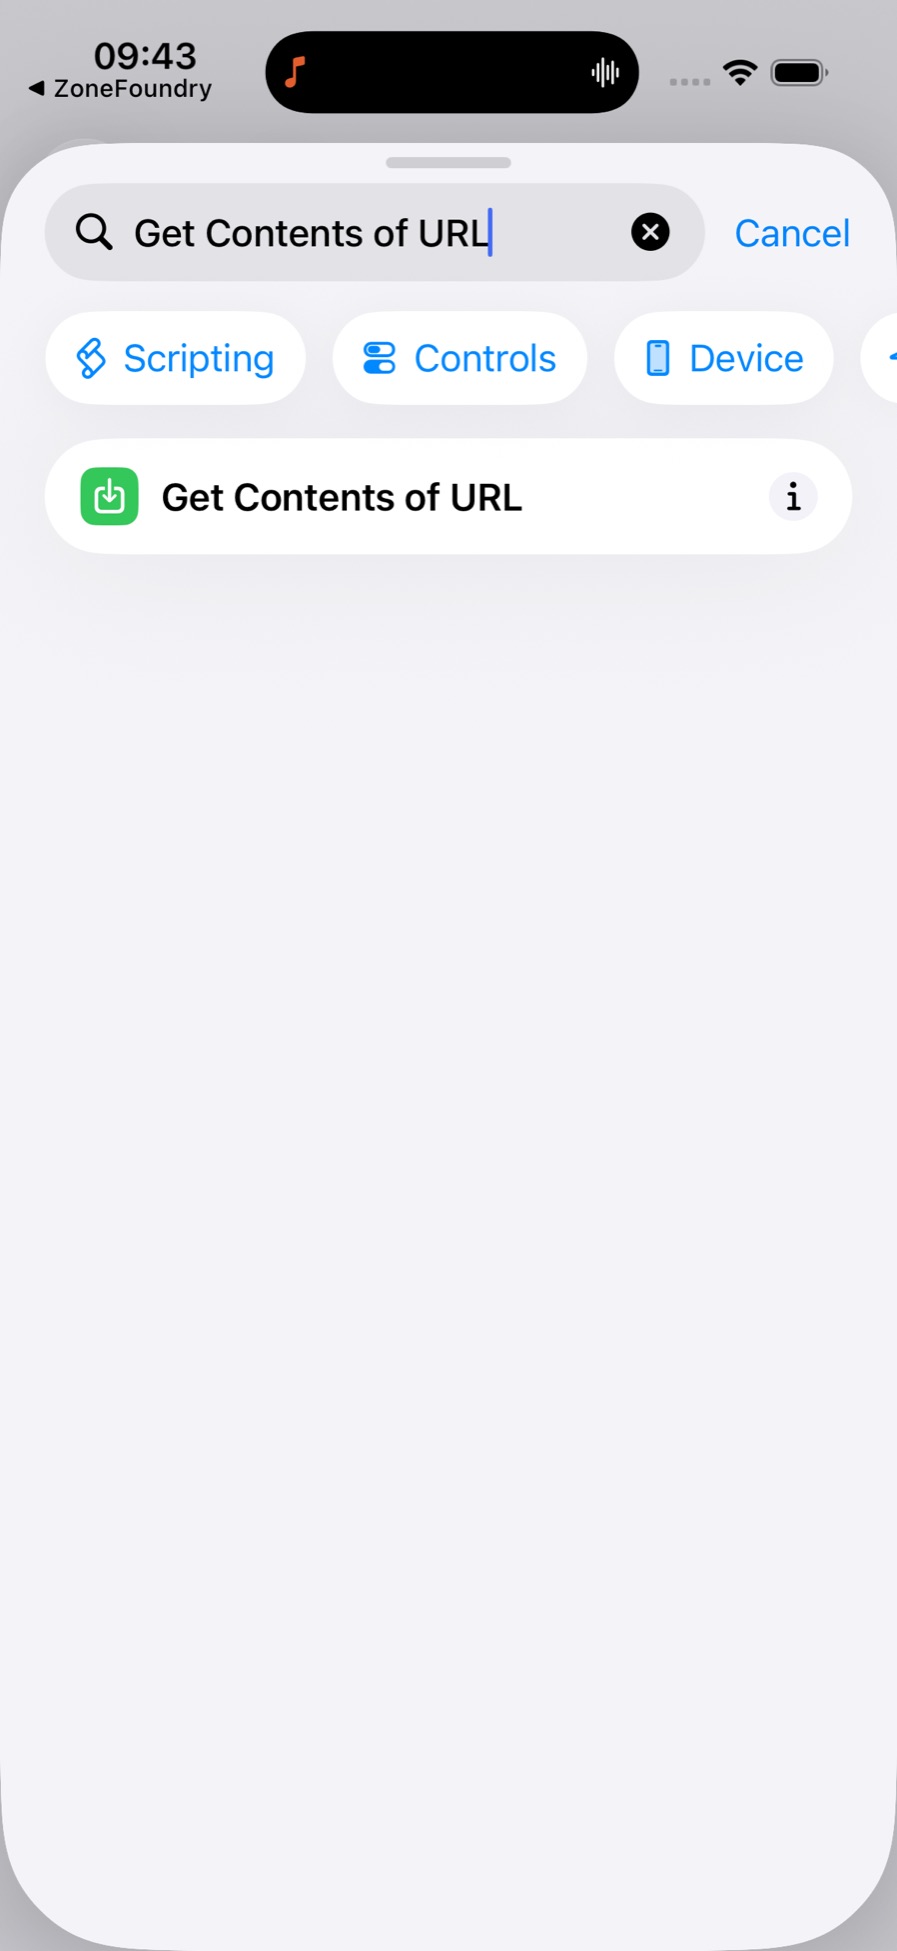
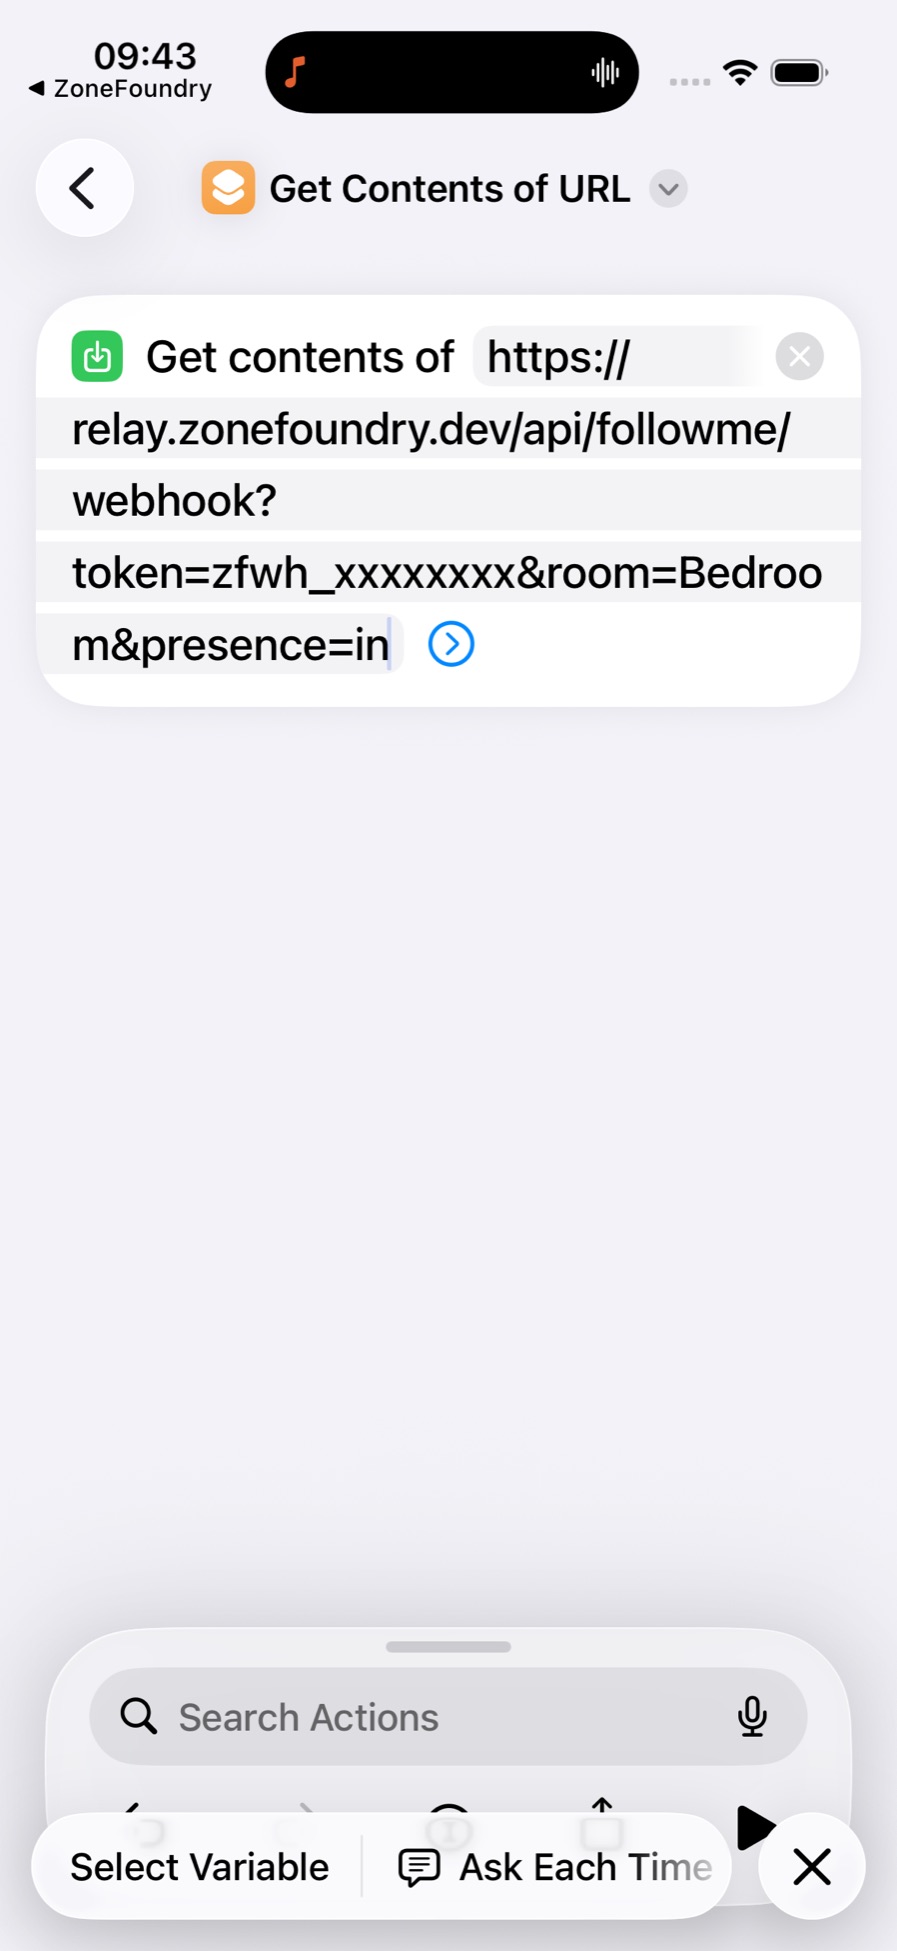
进到一个空白的快捷指令编辑器。底部搜索框打 Get Contents of URL(中文界面:获取 URL 内容),结果只有一条,点它加进去。然后点动作里那个浅蓝色的 URL 格,把备忘录里这个房间的「有人到」那条整条粘上去,点右上角 ✓。入到一個空白的捷徑編輯器。底部搜尋框打 Get Contents of URL(中文介面:取得 URL 內容),結果只有一條,點它加進去。然後點動作裡面那個淺藍色的 URL 格,把備忘錄裡這間房的「有人到」那條整條貼上去,點右上角 ✓。You land in an empty shortcut editor. In the search field at the bottom type Get Contents of URL — there's exactly one result; tap it to add it. Then tap the pale blue URL field in the action and paste this room's arrive link in full. Tap ✓ at the top right.
命名、确认、保存改名、確認、儲存Name it, check it, save
回到自动化页,可以改个名(例如 Follow Me-IN)。确认这几样,然后点右上角 ✓:返到自動化頁,可以改個名(例如 Follow Me-IN)。確認這幾樣,然後點右上角 ✓:Back on the automation screen, give it a name (e.g. Follow Me-IN), check the following, then tap ✓:
- 启用此自动化 = 开啟用此自動化 = 開Enable This Automation = on
- 当 = 「在〈房间〉中检测到有人」當 = 「在〈房間〉中偵測到有人」When = "Occupancy Detected in ⟨room⟩"
- 执行 = 「快捷指令(无场景或配件)」—— 显示「无场景或配件」是正常的,不是出错執行 = 「捷徑(無場景或配件)」—— 顯示「無場景或配件」是正常,不是出錯Do = "Shortcut (no scenes or accessories)" — that "(no scenes or accessories)" line is expected, not an error
这里没有「运行前询问」这一项 —— 那是「快捷指令」里个人自动化才有的开关。经「家庭」App 建的自动化直接在家庭中枢上跑,不会弹通知等你点。這裡沒有「執行前先詢問」這一項 —— 那個是「捷徑」裡個人自動化先有的掣。經「家庭」App 建的自動化直接在家庭樞紐上跑,不會彈通知等你按。There is no "Ask Before Running" here — that switch only exists on personal automations in Shortcuts. Automations built in the Home app run on your Home Hub without prompting.
再建第二个:「停止检测是否有人」再建第二個:「停止偵測是否有人」Build the second one: "Stops Detecting Occupancy"
重复第 4–8 步,只有两处不同:第 5 步改选「停止检测是否有人」,第 7 步贴「离开」那条链接。之后每一间要跟着你走的房,都照这样做两个。重複第 4–8 步,只有兩處不同:第 5 步改選「停止偵測是否有人」,第 7 步貼「離開」那條連結。之後每一間要跟著你走的房,都照這樣做兩個。Repeat steps 4–8 with two changes: in step 5 choose "Stops Detecting Occupancy", and in step 7 paste the leave link. Then do both for every room you want to follow you.
传感器在哪间房,链接就要写哪间房。Follow-Me 的语义是「传感器在 A 房 → A 房跟着你走」。所以客厅那个传感器的自动化,链接里的 room= 必须是客厅。配反了会变成「有人走进客厅 → 另一间房开始播」,那不是 Follow-Me。检查方法:打开自动化,对一下「当:在【X】中检测到有人」和链接里的 room=【X】 是不是同一间。感應器在哪一間房,連結就要寫哪一間房。Follow-Me 的語義是「感應器在 A 房 → A 房跟著你走」。所以客廳那個感應器的自動化,連結裡的 room= 必須是客廳。配反了會變成「有人走進客廳 → 另一間房開始播」,那個不是 Follow-Me。檢查方法:打開自動化,對一對「當:在【X】中偵測到有人」同連結裡的 room=【X】 是不是同一間。The link's room must match the sensor's room. Follow-Me means "sensor in room A → room A follows you". So the automation for the living-room sensor must use room= the living room. Get it backwards and you'll get "walk into the living room → a different room starts playing", which isn't Follow-Me. To check: open the automation and compare "When: Occupancy Detected in ⟨X⟩" against room=⟨X⟩ in the link.
关于「离开延迟」—— 改了设置不用重贴链接關於「離開延遲」—— 改了設定不用重貼連結About the leave delay — changing it doesn't mean re-copying
链接尾巴那个 delay=60 是复制链接那一刻的设置写进去的,但它只是备用值。真正说了算的是 App 里的当前设置:服务器每次收到请求,都会用你现在设的秒数覆盖掉链接里那个。連結尾巴那個 delay=60 是複製連結那一刻的設定寫進去的,但它只是後備值。真正話事的是 App 裡的當前設定:伺服器每次收到請求,都會用你現在設的秒數覆蓋了連結裡那個。The delay=60 at the end of the link records the setting at the moment you copied it — but it's only a fallback. What actually decides is the current setting in the app: on every request the server overrides the link's value with whatever you have set now.
所以:在 ZoneFoundry 的 Follow-Me 页改了离开延迟,已经贴进「家庭」自动化的旧链接会自动跟新值,三个执行体(桥/本机/云端)全部一样,不用重新复制链接。所以:在 ZoneFoundry 的 Follow-Me 頁改了離開延遲,已經貼入「家庭」自動化的舊連結會自動跟新值,三個執行體(橋/本機/雲端)全部一樣,不用重新複製連結。So: change the leave delay in ZoneFoundry's Follow-Me page and the links you already pasted into Home automations follow the new value automatically — same for all three executors (bridge, this device, cloud). No need to copy the links again.
唯一还需要重贴链接的情况是房间改了名。房名是烘死在链接里的(room=Bedroom),服务器不会替你改。改名之后回 App 重新「Get my links」,把新链接重贴一次。服务器认不出房名会直接报错,不会默默失败。唯一仍然需要重貼連結的情況是房間改了名。房名是寫死在連結裡的(room=Bedroom),伺服器不會幫你改。改名之後返 App 重新「Get my links」,把新連結重貼一次。伺服器認不到房名會直接報錯,不會默默失敗。The one change that does require re-copying is renaming a room. The room name is baked into the link (room=Bedroom) and the server won't rewrite it. After a rename, go back to "Get my links" in the app and re-paste. The server reports an error when it doesn't recognise a room name — it won't fail silently.
验证有没有生效驗證有沒有生效Check that it works
「家庭」App 的自动化页最下面有「测试此自动化」,先用它跑通再走真人测试。测云端这一档的时候,记得把桥关掉、把 ZoneFoundry 退到后台 —— 不然更近的执行体会先接手,你测的根本不是云端。「家庭」App 的自動化頁最下面有「測試此自動化」,先用它跑通,才做真人測試。測雲端這一檔的時候,記得把橋關了、把 ZoneFoundry 退到背景 —— 否則更近的執行體會先接手,你測的根本不是雲端。Each automation page has a "Test This Automation" button at the bottom — use it before walking around. To test the cloud executor specifically, take the bridge offline and send ZoneFoundry to the background, otherwise a closer executor takes the job and you aren't testing the cloud at all.
| 动作動作Action | 实测耗时實測耗時Measured |
|---|---|
| 进 → 喇叭加入并出声入 → 喇叭加入並出聲Arrive → room joins and starts playing | 约 6–9 秒(含 HomeKit 传感器本身的 2–4 秒)約 6–9 秒(連 HomeKit 感應器本身的 2–4 秒)about 6–9 s (including the 2–4 s the HomeKit sensor itself takes) |
| 出 → 解组出 → 解組Leave → ungroup | 你设的延迟 + 约 7 秒(云端做淡出、离组、还原音量)你設的延遲 + 約 7 秒(雲端做淡出、離組、還原音量)your delay + about 7 s (fade out, leave the group, restore volume) |
没反应?三个最常见原因沒有反應?三個最常見原因Nothing happens? The three usual causes
| 症状症狀Symptom | 原因原因Cause | 怎么修點修Fix |
|---|---|---|
测试自动化时报错 unknown_room測試自動化時報錯 unknown_roomTesting the automation reports unknown_room |
房间改过名,链接里还是旧房名房間改過名,連結裡仍然是舊房名The room was renamed; the link still has the old name | 回 App 重新「Get my links」,重贴一次返 App 重新「Get my links」,重貼一次Go back to "Get my links" and re-paste |
| 进对了房,却是别的房在响入啱了房,但是另一間房在響You enter one room but a different room starts playing | 传感器所在的房 ≠ 链接里的 room=感應器所在的房 ≠ 連結裡的 room=The sensor's room doesn't match room= in the link |
对一下两边,改成同一间對一對兩邊,改成同一間Compare the two and make them the same room |
| 自动化根本没触发自動化根本沒有觸發The automation never fires | 「启用此自动化」被关了,或传感器本身没上报「啟用此自動化」被閂了,或者感應器本身沒有上報"Enable This Automation" is off, or the sensor isn't reporting | 打开自动化页确认开关;在「家庭」里看传感器状态打開自動化頁確認個按鈕;在「家庭」度看感應器狀態Check the switch on the automation page; check the sensor's state in Home |
为什么不能做成「一键导入」?这是 iOS 的限制,不是偷懒。HomeKit 自动化的动作只能是「写入配件特性」,没有「打一条 URL」这种动作;而「快捷指令」的家庭自动化又没有 API 让第三方 App 帮你建。所以「选哪个传感器」这一步无论如何都得人来做 —— App 不知道你那个传感器叫什么名字。為何不可以做成「一鍵導入」?這個是 iOS 的限制,不是偷懶。HomeKit 自動化的動作只可以是「寫入配件特性」,沒有「打一條 URL」這種動作;而「捷徑」的家庭自動化又沒有 API 給第三方 App 幫你建。所以「選哪一個感應器」這一步無論如何都要人做 —— App 不知你那個感應器叫咩名。Why isn't there a one-tap import? It's an iOS limitation, not laziness. A HomeKit automation's action can only write an accessory characteristic — there is no "open a URL" action — and Shortcuts' home automations have no API for a third-party app to create them. So picking the sensor will always be a human step: the app has no way to know what your sensor is called.